How to use the new Command Center
— Breaker Labs
Command Center is where you operate a break. The widget editor is where you customize its appearance. This guide walks through the current Command Center layout, using a Team Tracker as the main example.
Screenshots use sample widgets and demo data. Available controls depend on your widget type, subscription, and OBS connection.
1. Find your way around
Open Command Center from your dashboard.
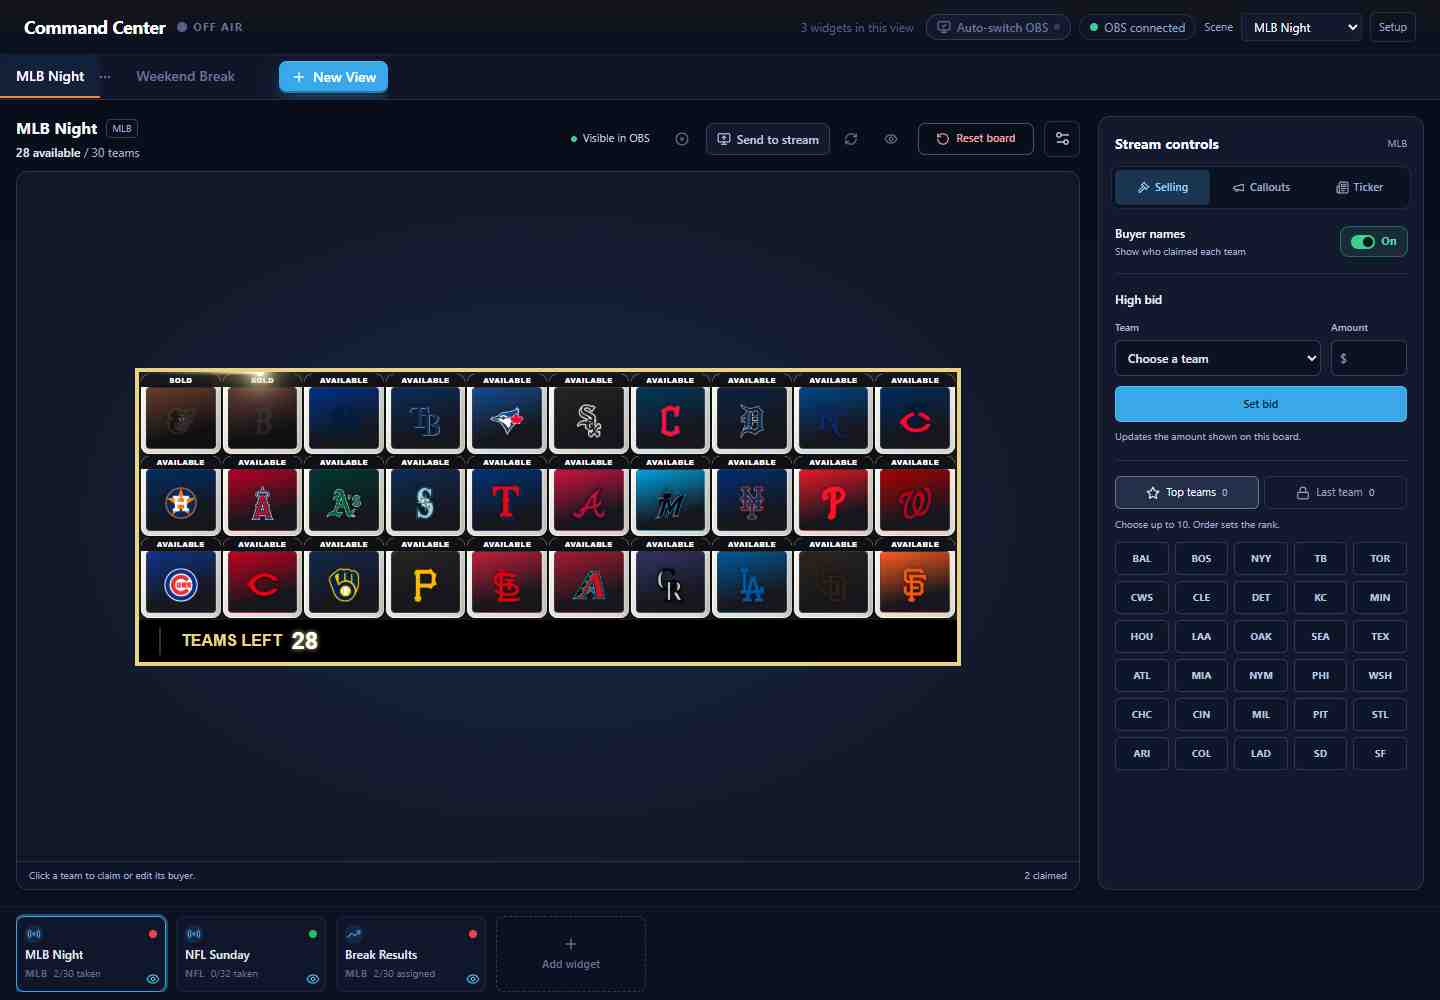
| Area | What you do here |
|---|---|
| Top header | Check OFF AIR / LIVE and OBS connection status. On desktop, connect OBS, choose a Scene, open Setup, or use Auto-switch OBS. |
| View tabs | Switch between saved groups of widgets, or create a New View. A view is a widget group; an OBS scene is the arrangement of sources in OBS. |
| Board and its heading | Operate the selected widget, check the available count, manage its OBS source, or reset that board. |
| Stream controls | For Team Tracker, use Selling, Callouts, and Ticker. The controls scroll separately from the board. |
| Bottom widget strip | Select the widget you want to operate, add a widget to the view, or remove one from the view. |
The selected widget is sometimes described as being on stage. Selecting it chooses which controls you work with. Whether that selection also changes OBS depends on Auto-switch OBS.
2. Build a view and choose a widget
- Select an existing view tab, or choose New View, enter a name, and create it.
- On desktop, select + Add widget in the bottom strip and choose an existing widget. Repeat for the widgets you want in this view.
- Select a widget tile to load its board and controls. The selected tile is highlighted.
- To remove a widget from the view, use its tile’s remove button. This does not delete the widget or remove its source from OBS.
Changes to the widget membership of a view save automatically. Look for View saved after a change. The view’s options menu lets you rename or delete the view; deleting it removes the saved layout, not the widgets.
Selecting a different view does not itself switch your OBS scene. Use the header’s Scene selector when you intend to change the scene OBS displays.
3. Operate a Team Tracker with Selling
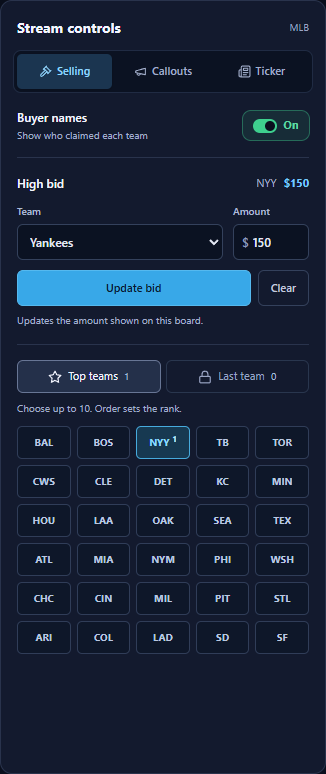
The Selling tab groups the controls you reach for while taking claims and running bids.
Claims and buyer names
Click a team on the board to change its claim state. When Buyer names is enabled, clicking a team opens the claim or buyer-editing flow. The available count above the board helps you track what remains.
The Buyer names switch appears for supported boards with the required plan access. Grouped boards can have different controls: follow the instruction below the board to claim a spot rather than looking for individual-team options.
High bid
- Under High bid, choose a Team.
- Enter the Amount in whole dollars.
- Select Set bid. Once a bid exists, the button becomes Update bid.
- Change the amount and select Update bid to publish the next amount. Use Clear to remove the bid.
Editing the field alone does not publish the number. Setting a high bid updates the board’s bid display; it does not claim or hold the team.
Top teams and Last team
- Top teams: select teams in the order you want them ranked. The picker displays the rank on selected teams and shows the current limit.
- Last team: select teams to hold them back; select them again to release them. A team already claimed cannot be newly held.
These selections update live. The options are available for supported individual-team boards; grouped layouts may instead direct you to manage claims on the board.
4. Send a callout or update the ticker
Callouts
Select Callouts in Stream controls.
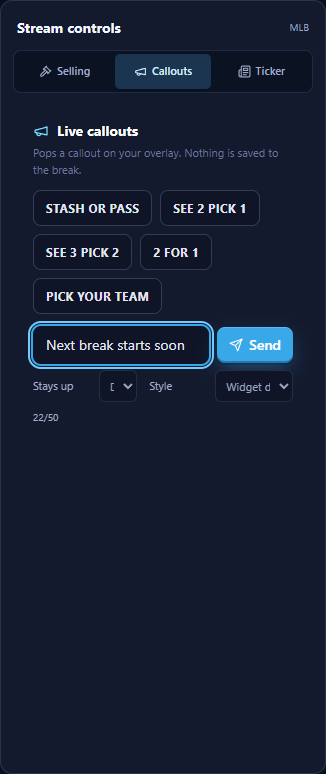
Select a preset to send it immediately, or enter Custom callout text and select Send. Preset wording can reflect the names configured in your widget editor, and saved callouts appear when you have configured them.
Use Stays up to choose the duration and Style to choose the appearance for that send. Leaving them at their defaults uses the widget’s configured choices. Callouts are temporary overlay messages; sending one does not save a claim or change the break’s results. Some styles require Pro access.
Ticker
Select Ticker, edit the message list, then choose Update ticker to publish it.
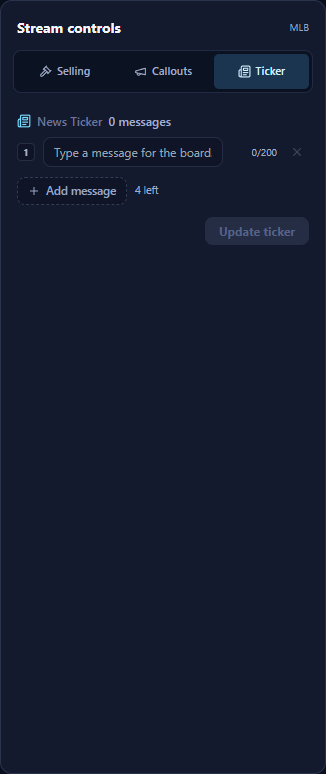
Use Add message for another entry. The editor shows message limits and character counts. Update ticker stays disabled until there is an allowed change to publish. Changing tabs keeps the current panel drafts while the same widget remains open; publish before switching to another widget or leaving the page.
If the tab tells you to enable the news ticker, open the widget editor, enable it there, save the widget, and return to Command Center. Ticker controls also depend on plan access.
5. Connect OBS and control what viewers see
On desktop, select Connect OBS in the header. Follow the OBS Direct Sync setup guide if you have not enabled the OBS WebSocket server yet. Once connected, the header displays OBS connected and a Scene selector.
Add your widgets
Open Setup → Set Up My Break to create or reuse a scene named after your view, add its saved widgets, and switch OBS to that scene. Arrange the sources in OBS after the first setup. Re-syncs preserve existing placement.
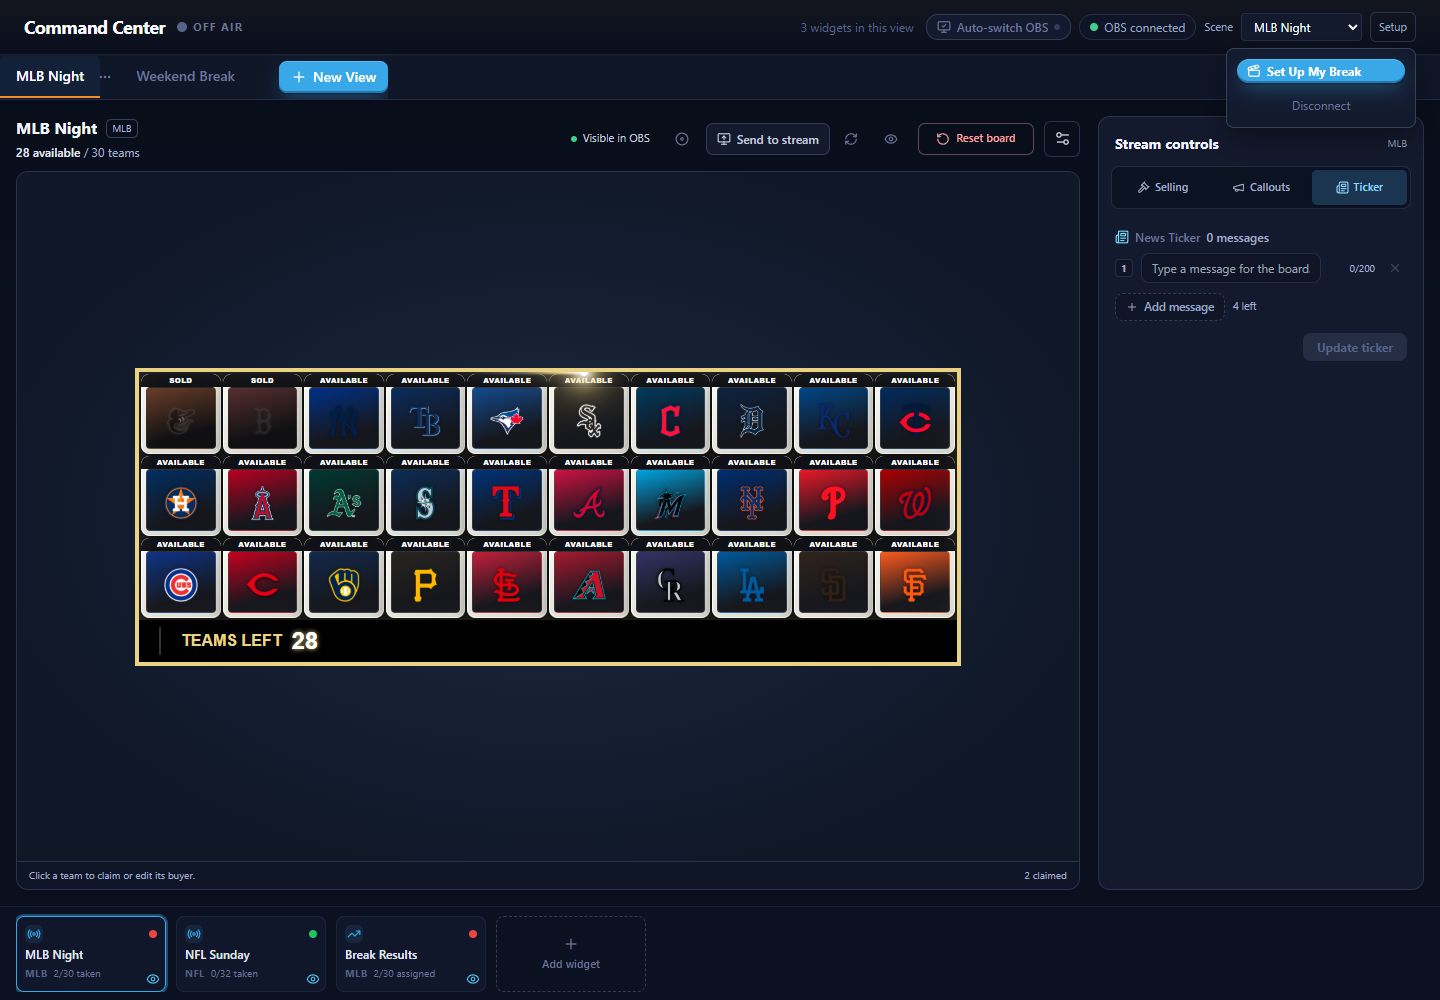
To add only the selected widget, use Add to OBS beside the board. While connected, this can be a compact icon; its accessible label is Add to OBS. The separate setup icon beside the board reveals the widget URL and dimensions for manual Browser Source setup.
Choose a switching method
| Control | Result |
|---|---|
| Select a widget tile with Auto-switch OBS off | Changes the board and controls you operate without automatically changing source visibility in OBS. |
| Eye control on a tile or beside the board | Shows or hides that widget’s OBS source independently. Useful when you want several overlays visible together. |
| Send to stream | Shows the selected widget and hides the other distinct widget sources in the current view. It appears when OBS is connected and the view contains more than one distinct OBS input. |
| Auto-switch OBS | Turning it on sends the selected widget to OBS immediately. Further widget selections automatically show that widget and hide the other distinct sources in the view. |
Auto-switch OBS is the current visible name of the control previously called Follow Stage. It is off by default and remembers your choice in the current browser. Changing views alone does not trigger an automatic solo. Reconnecting with the setting enabled can reapply the selected widget to OBS, so check the setting before reconnecting during a show.
Use Visible in OBS / Hidden in OBS beside the board to check the selected source. Use OFF AIR / LIVE in the header to check streaming status. An OBS connection by itself does not mean you are broadcasting.
To keep multiple overlays visible, turn Auto-switch OBS off and use the eye controls individually. Hiding a source preserves its position and settings. If an OBS action reports a failure, check the message and the scene in OBS before assuming the change reached your stream.
6. Start the next break
For Team Tracker, select Reset board above the board. The button changes to Confirm reset?; select it again within the confirmation window to reset the current board.
This clears that tracker’s claims, Top teams picks, Last team holds, and high bid. It does not reset every widget in your view or erase the widget’s visual design.
Other widget types have their own operations. For example, Break Results presents owner assignments with Print and Clear All rather than the Team Tracker Selling panel. Always check the selected widget name before clearing data.
7. Use Command Center on your phone
The desktop strip and docked controls are replaced by smaller-screen controls.
- Use the bottom view selector to choose a view. The adjacent options menu provides view actions.
- Tap Widgets at the bottom, or the menu button at the top, to open the widget drawer.
- In the drawer, use On stage to select the widget you want to operate. The switches below manage which widgets belong to the view; they are not OBS visibility switches. Tap Done to close the drawer after managing membership.
- For a Team Tracker, tap Controls above the board to open Stream controls. Choose Selling, Callouts, or Ticker. Close the sheet with its close button to return to the board.
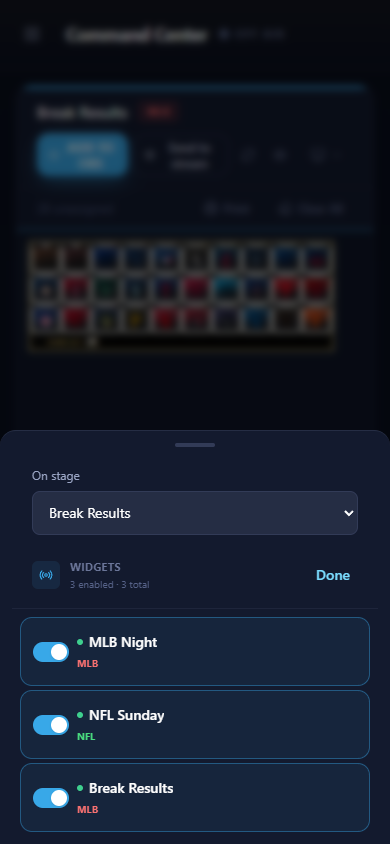
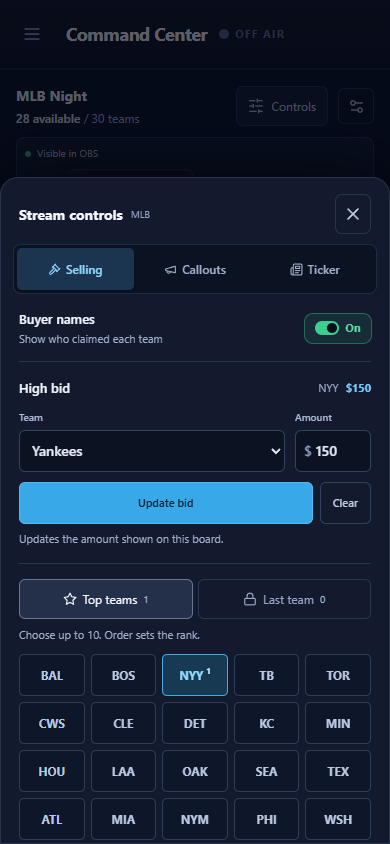
The desktop OBS header controls are hidden on smaller screens. Set up the OBS connection on your streaming computer; do not expect the phone’s Widgets switches to show or hide sources in that computer’s OBS session.
If something is missing
- No board: create a view and add an existing widget, or select one in the mobile Widgets drawer.
- No Auto-switch OBS: use the desktop layout, connect OBS, and check subscription or trial access.
- No Set Up My Break: open the connected header’s Setup menu and make sure the current view contains a saved widget.
- No Send to stream: check OBS connection, plan access, and whether the view has more than one distinct OBS input. Two widgets sharing the same type and sport can share one input.
- No High bid or team picker: the available controls depend on the selected widget, board grouping, and plan. Team Tracker, Break Results, and Wheel Randomizer do not all share the same controls.
- Ticker asks you to enable it: enable and save the ticker in the widget editor first.
For appearance changes, use the widget editor guide. If you are still stuck, open the Help Center or email [email protected].